Choose your circular screw-in ND filter from Kase
Browse our catalogue and find the ND filter matching your needs.

Em stock

Em stock
More about Kase circular screw-in ND filters
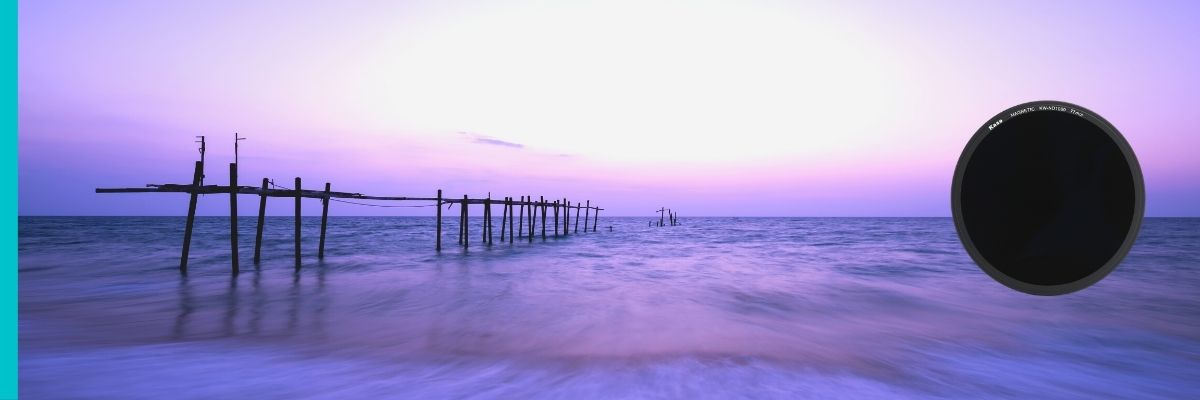
The Kase Neutral Density Filters are great for adjusting the amount of light that gets through to the camera sensor. The resulting longer exposure times can be used, for example, to capture the movement of clouds or to draw water as soft as silk. The different strengths of circular ND filters, graded in ND8, ND16, ND64 and ND1000, allow you to shoot in any situation!
The Kase Wolverine series scores excellent colour neutrality. This is due to the high-precision optical glass we use, which is also very shatterproof. In addition, the filters are very easy to clean thanks to an oil and water-repellent coating.
Need a filter holder for your lens? You can find it together with the filters in our kits or separately in the filter holder category.
FAQ about Kase circular screw-in ND filters
What is an ND filter and how does it work?
The ND filter stands for Neutral Density. This means that a grey filter should attenuate all colour ranges or wavelengths of the visible spectrum of light evenly. Apart from the exposure time and the aperture, the ND filter is an additional means that can be used to regulate the strength of the light that hits the camera sensor as desired. That is why ND filters come in different strengths, depending on how much light the photographer wants to let pass through the lens onto the camera sensor.
In which situation is which circular neutral density filter used?
- The ND8 filter is used for sunny days and slightly cloudy skies.
- The ND64 filter is used for snowy landscapes on sunny days, reflective water surfaces or similar.
- The ND1000 filter is mainly used in landscape photography to create blurred clouds and soft water.
Which ND filter strengths should you buy for your camera?
The most common circular ND filters among our clients are ND8, ND64 and ND1000 filters. The ND8 filter darkens 3 f-stops, the ND64 filter 6 f-stops and the ND1000 10 f-stops. To select the right filter for you, you need to consider in which conditions you will shoot. Alternatively, you can opt for a variable ND filter, which will allow you to adapt to different lighting conditions.
What effects can be achieved when using Kase circular screw-in ND filters?
A neutral density filter is primarily used for longer exposure times or long exposures. Besides this, there are many other areas of application for ND filters. For example, circular neutral density filters are a perfect tool to make the flowing water in a stream or waterfall look velvety. In city photography, for example, you can make people "disappear" with the help of an ND filter when photographing a crowded place.
As a rule, an ND filter is always used if you need longer exposure times during the day or if you want to use it for a certain creative effect.
Long exposures without ND filter - is it possible?
Of course, it is also possible to take long exposures without ND filters, but for this, you have to take the pictures during the late blue hour or at night. During the day it is otherwise too bright to take pictures with extended exposure times without ND filters. This is exactly where the great advantage of grey filters comes into play: you can easily have long exposures throughout the day.
How to calculate the shutter speed when photographing with an ND filter?
Calculating the appropriate shutter speed with an on-lens ND filter is a fairly simple process that requires just a few steps:
- Install all the filters except for the ND filter, that is, the CPL filter and, if necessary, the GND filter. Take a correctly exposed test shot that you like and note the exposure time. For example, 1/30 second.
- Attach an ND filter, for example, the Kase ND1000 100x100 mm. 1000 indicates how often the previously determined shutter speed must be multiplied. As soon as the filter has been mounted, 1000 times less light falls on the camera sensor. Thus, the shutter speed is increased by a factor of 1000.
- If you have a shutter speed of a fraction of a second, as is the case here, it is best to give the value in seconds first: 1/30 of a second equals 0.0334 seconds. This value is then multiplied by 1000, which means 0.0334 x 1000 = 33.4 seconds. This is the new shutter speed required to get a shot with the same exposure when having the ND1000 filter in front of the lens.
Can you combine polarising filters and circular ND filters?
Especially when taking pictures of water, it is often useful to combine the ND filter with a polarising filter. To do this, first screw the polarising filter onto the lens and then adjust it. Then screw the neutral density filter onto the lens. Make sure that both filters are correctly adjusted.
What camera accessories do I need when photographing with a circular ND filter?
- Stable tripod: You will need a tripod for taking pictures with a neutral density filter. Depending on the focal length, it is not possible for most people to shoot handheld at exposure times of 1/40 seconds or even longer without blurring the image. Professional photographers are sometimes able to shoot hand-held for up to 1/20 second, but exposure times of about one second and more put an end to hand-held photography, even for professionals.
- Remote or timer release: In addition, a remote release can be useful. The picture can blur even when the shutter is released. Alternatively, you can use the camera's self-timer.
Table for exposure time with ND filters
Use our ND Filter exposure table to find out what exposure time should be used with different filters.