


Screw-in CPL filters from Kase
Find the right filter for your needs in seconds!

Not In Stock

In Stock

In Stock
Screw-in polarizing filters from Kase: how they work?
The CPL filter is attached in front of the lens and is then immediately ready for use. This filter requires a slightly higher exposure time, but this can be easily adjusted on the camera. It is best to work with a tripod to ensure that the images are not blurred.
Once the CPL filter is attached to the lens, the filter can be adjusted by turning it, which changes the wavelength of the light that is filtered out. It is best to look through the viewfinder of the camera and at the same time carefully turn the polarizing filter until the desired effect is achieved. If the filter is rotated by more than 90°, the effect is reduced again. The appropriate angle of rotation depends on the angle of the incident light and the selected subject. In general, it can be said that the best effect is achieved when the light source falls on the subject at an angle of around 90°.
Should I opt for a slide-in or screw-in CPL filter?
Slide-in CPL filter
Slide-in filters are not used as frequently as CPL screw-in filters. However, they have the advantage that they can be changed more quickly than screw-in filters and can also be adjusted in height. The problem is that light can penetrate through slits from the outside, especially with cheaper slide-in filters. We solved this problem with our slide-in filters by using seals on the filter holders. CPL slide-in filters are not as easy to turn as circular screw-in polarizing filters. However, we managed to solve this problem with our new K100 slide-in filter with a rotating function.
| Advantages | Disadvantages |
|
|
|
Screw-in CPL Filter
A screw-in filter can be used immediately once attached. Since this type of filter is screwed directly onto the lens, it is very difficult or impossible for light to penetrate from the outside. In addition, as already mentioned, turning a screw-in CPL filter is much easier. However, changing takes a little longer and it can happen that the filter is stuck on the lens if it is screwed on too tightly.
| Advantages | Disadvantages |
|
|
|
FAQ about circular polarizing screw-in filters
How does a polarizing filter work?
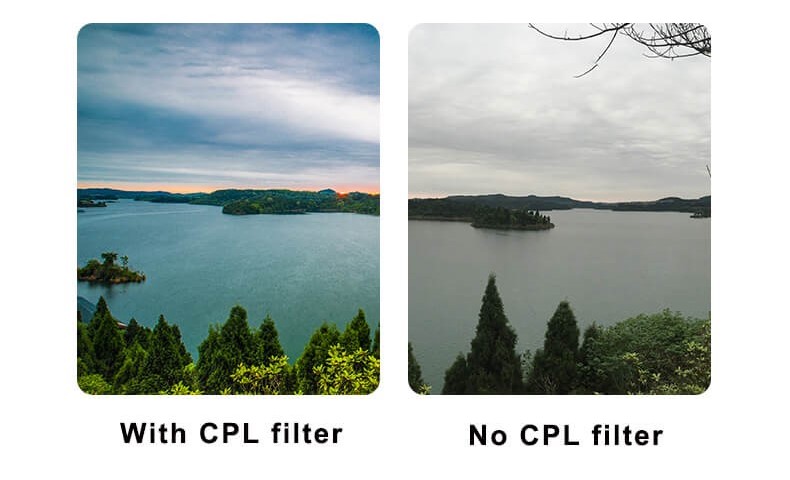
A polarizer filter selectively allows light waves aligned in a specific direction to pass through the camera lens, reducing glare, enhancing color saturation, and improving overall image quality. By rotating the CPL filter on the lens, photographers can control the level of polarization and selectively eliminate or minimize glare from reflective surfaces.
Can I use a circular polarizing screw-in filter with different lenses?
Yes, it is possible. To do this, you will need a step-up ring. In this case, you should buy the polarizing screw-in filter for the lens with the largest filter diameter. Then, using a step-up ring, you can adapt it to the different filter diameters.
How many stops does CPL filter have?
A polarizing filter allows less light to pass through to the camera sensor. Usually, this is two f-stops of light. It means that depending on the lighting situation, you may have to work with a tripod or increase the ISO. This can also be an advantage, on the other hand, if the subject comes into its own better with a slightly longer exposure.
How to clean a screw-in polarizer?
Start by removing loose particles using a blower brush. For smudges or fingerprints, lightly dampen a lens-cleaning tissue or microfiber cloth with a lens-cleaning solution or a mixture of distilled water and a drop of mild dish soap. Gently wipe the filter in a circular motion, starting from the center and moving outward. Dry the filter thoroughly and check for streaks, repeating the process if necessary.
Store the CPL filter in a protective case when not in use to prevent dust and scratches. Make regular cleaning a part of your gear maintenance routine, avoiding abrasive materials and excessive force.
How to use a screw-in circular polarizing filter?
- Attach filter: Screw the polarizing filter onto your camera lens securely. Ensure it's securely attached but not over-tightened.
- Observe and adjust: Rotate the outer ring of the polarizing filter to observe changes in glare and reflections. Adjust for the desired effect.
- Consider sun angle: The effectiveness of the polarizing filter varies with the angle of the sun. Experiment with different angles by rotating the filter to find the optimal position for your shot.
- Be mindful of artifacts: Avoid excessive polarization to prevent unnatural effects, especially in wide-angle shots.
How do I choose the correct size of screw-in CPL filter for my lens?
To determine the right size for a screw-in CPL filter, first, check the lens diameter, usually marked on the front of the lens with a symbol like Ø followed by a number (e.g., Ø58mm). If this information is not visible, consult your camera's user manual or the lens documentation. Alternatively, measure the diameter directly using a ruler by assessing the distance between the threads. Once you have the correct diameter, select a screw-in CPL filter with a matching size (e.g., 58mm).
If you anticipate using the filter on future lenses, consider a size that fits your largest lens or use step-up rings to adapt smaller filters to larger lenses.
Read more about how to choose the filter size in our blog.
Can I keep a polarizing filter on the camera lens all the time?
Yes, it is possible, but not recommended because the polarizer absorbs light which may lead to a darker image. Therefore, it's advisable to use the CPL filter only when you need to achieve this effect.